
| Summary: | This article is a continuation of the theme of maximizing efficiencies through an informed configuration of your Paribus system – Review Information Columns |
| Article Type: | How-To Guide |
| Related Product(s): | This article relates to the following products:
|
Note: This article assumes the reader has read the included Paribus Discovery documentation and understands the basic concepts of the building blocks of the Paribus Discovery configuration, including Data Providers, Data Sets, Match Conditions, Match Sets and Match Sessions. In addition, you should be familiar with how to run a Paribus Cleansing Session for your CRM system.
Introduction
In a previous article – Gaining Efficiencies with Paribus Discovery – Filters, we covered many of the basic steps to setting up logical Match Sessions and how to create Filters that will make sense for your particular needs. This article is a continuation of the theme of maximizing efficiencies through an informed configuration of your Paribus system.
Data Set Information Columns
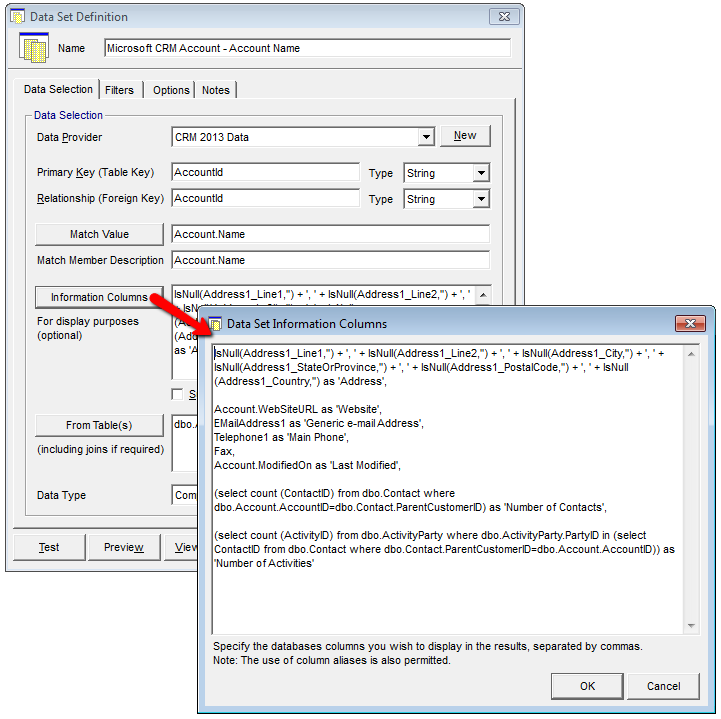
During the Match Session process, when Paribus finds matching records, it will collect some information about those records. In the Data Set definition, this information is called the Information Columns:
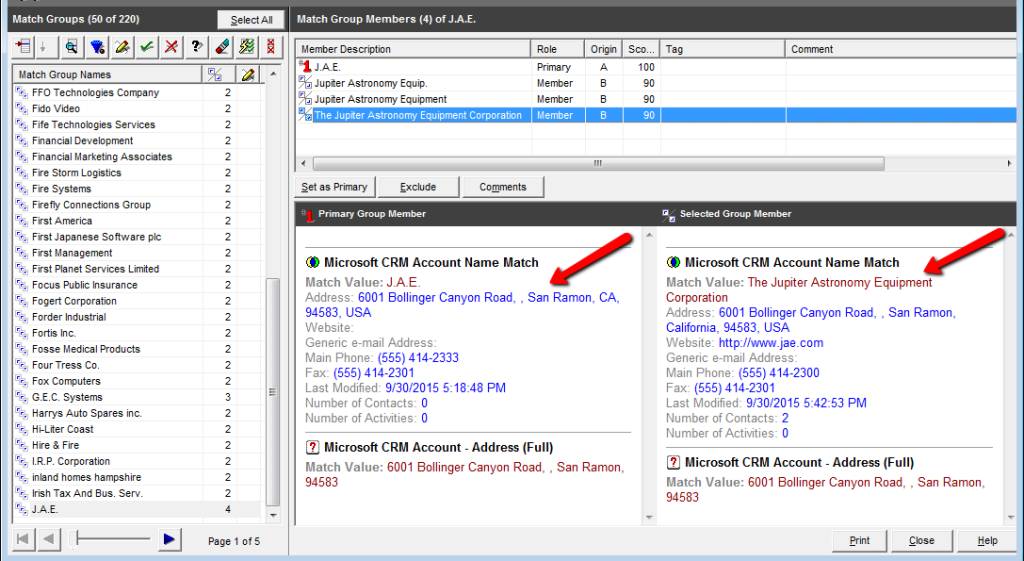
The information requested here will show up in the Paribus Review screen in blue text for the Reviewer to use to answer the two questions:
Q1) Are the members of this group of matches actually duplicates we would like to process?
Q2) If we agree that the records should be merged, which record should be the surviving record?
With the goal of spending the least amount of time in the Review process as possible, the key is to select just the right information for Paribus to gather for the review to allow the Reviewer to make quick, informed decisions. If you’ve constructed some initial Match Sessions, with very high Match Thresholds, you should have been able to clean up many of the obvious matches with very little or no review. However as you lower the Match Thresholds to allow for more variations, in an effort to catch the less obvious matches, your Reviewer will now be evaluating each Match Group to make the decisions on which Groups to approve and (potentially) which Member should be the Primary (surviving) record.
So, what should you be including in the Information Columns? Some of the most commonly used information is already included in the pre-set Definitions that you likely imported into your Control Database. Things like:
For Account Matches
- Full Primary Address
- Main Phone Number
- Web Address
- Type
- Date Created
- How many History records
- Date of the most recent History record
For Contact Matches
- The Contact’s Account Name
- Physical Address
- Email Address
- Work Phone
- Mobile Phone
There are more data values included in the pre-built Definitions, but the above are good examples of what almost everyone would include. Having these items in the review screen for each Match Group goes a long way to help the Reviewer determine whether or not the Members of the Group are actually matches.
When performing an Account Match, the common tactic is to match on things like the Account Name and Addresses, but when you start allowing for more ‘fuzziness’ or variations in the matching criteria, you might be catching companies that are similar in name and address, but without being able to see things like their phone number or Web address, you wouldn’t be able to confirm with confidence that they truly are matches.
Similarly, with Contact Matches, the common setup is to look for Contacts with similar Names who are at the same Account, but with family businesses or larger companies, you might have more than one person with the same name – or Jr. and Sr. from the same family.
Providing more information (not too much more!) in the review can help your Reviewer make the right decision, and placing just the right information in just the right order can help them make the decision faster!
Some suggestions that might help:
For Account Matches
- Account Number from your Accounting System (maybe you need to have duplicates, so different Account Numbers would tell you NOT to merge)
- Status or some custom designation (an Active Account might have better information than an Inactive Account)
- The Account Manager’s Name (often used to determine the Primary when there are 2 different Account Managers on a duplicate – or inform you about who to ask regarding that Account)
- The number of Open Opportunities (although any Opportunities from duplicates will be moved to the Primary in the merge, if you’re actively working on a sale with an Account, that Account might have better core information and therefore a better Primary record)
- The Import Source (this may indicate the quality of the core data)
For Contact Matches
- Many of the same items as above
- Contact Title (you may wish to choose the Primary based on this)
- The number of Activities (if you have scheduled Activities on one Contact and not the other, that might indicate that the core data on the active Contact is better)
- Last History date (this may indicate that you’ve had interaction with one Contact more recently than another and help make the Primary choice easier)
All of these are simply suggestions. We’ve found that across a wide range of clients over the years that there isn’t any one “Right” answer as to what to include. And, as important as it is for you to include the relevant information to help your Reviewer, it’s equally important to NOT include irrelevant information, as that just adds “noise” to distract your Reviewer from what they need to see to make their decision(s).
Syntax and Layout
What you’re entering in the Information Columns fields are the selected columns (attributes) of data you would like Paribus to gather and the labels that you would like to be displayed. If you don’t specify a specific label, Paribus will display the name of the column from the table.
What you’re entering will be collected up into a SQL statement that will then store the information into the Paribus Control database as part of the Results of your Match Session.
Your selection can be as simple as the column name. For instance, if you wanted to display the Account’s Website value, the name for that column in the Account entity is WebSiteURL (in Microsoft Dynamics CRM, for example). You could enter it in as Account.WebSiteURL, but then the value in the review screen would carry the label WebSiteURL. If you entered it in as Account.WebSiteURL as ‘Website’, then the label would be “Website”, as it is shown in the screenshot above.
Each item you select needs to be separated by a comma and each element will appear one-per-line in blue text in the review screen. Items that show in red in the review are values Paribus matched on based on your settings.
Using more complex subqueries (counts, etc.) and correlated subqueries (complex counts, most recent records, etc.), you can get quite a selection of information for your Reviewer. There are some examples of these included in the pre-set Definitions, and here are some examples from both Microsoft Dynamics CRM and Saleslogix/Infor CRM:
Saleslogix/Infor CRM
Show the name of the User who wrote the most recent History record for an Account
(SELECT USERNAME FROM USERINFO WHERE USERID = (SELECT TOP 1 COMPLETEDUSER FROM HISTORY WHERE HISTORY.ACCOUNTID = ACCOUNT.ACCOUNTID ORDER BY COMPLETEDDATE DESC)) AS ‘Last History User’
Show the number of user-created (not system generated) History records for an Account
(SELECT COUNT (HISTORYID) FROM HISTORY WHERE HISTORY.ACCOUNTID = ACCOUNT.ACCOUNTID AND HISTORY.TYPE <> ‘262156’) As ‘Count of History Records’
Microsoft Dynamics CRM
Show the number of Contacts for an Account
(SELECT count (ContactID) from dbo.Contact where dbo.Account.AccountID=dbo.Contact.ParentCustomerID) as ‘Number of Contacts’
Show the Date of the most recent Scheduled Activity for a Contact
(SELECT TOP 1 ScheduledEnd FROM dbo.ActivityParty WHERE dbo.Contact.ContactID=dbo.ActivityParty.PartyID ORDER BY ScheduledEnd DESC) As ‘Scheduled Latest Activity’
What appears in the review screen is entirely up to you. Take some time during the setup process to think this through. Talk to your business users who really understand the use of your data and who will be making these decisions or who will be impacted by your decisions.
What information would aid your Reviewer to make the best choices as quickly as possible without having to look at the records within your CRM system itself? Remember, the more attention to details like this during the creation of your Paribus settings, the better your results will be and the faster you’ll get through your cleansing project and on your way to cleaner data.
| Related Resources: | |
| Further Information: |