| Summary: | The process of identifying and merging duplicate records using Paribus Discovery (herein shortened to Paribus) can be distilled down to four steps |
| Article Type: | How-To Guide |
| Related Product(s): | This article relates to the following products:
|
Just like any other project, cleaning up the duplicates in your data requires some work. How much time it will take is dependent upon the size of your data store, the size of your problem (how many duplicates you have), the speed of your infrastructure, the complexity of your decisions and the level of your knowledge. We hope to assist in the only one of these areas we have any control over – your knowledge.
Note – This article assumes the reader has read the included Paribus Discovery documentation and understands the basic concepts of the building blocks of the Paribus Discovery configuration, including Data Providers, Data Sets, Match Conditions, Match Sets and Match Sessions. In addition, you should be familiar with how to run a Paribus Cleansing Session for your CRM system.
Overview
The process of identifying and merging duplicate records using Paribus Discovery (herein shortened to Paribus) can be distilled down to four steps:
- Setup – This includes configuring Paribus to point to the data source – or a filtered subset of the data source you’re working with (i.e., your CRM system) and identifying what element(s) of data you wish to use as points of comparison, in what combinations, and at what matching thresholds (how similar data items need to be to be considered ‘matches’). All of this culminates in having what Paribus calls a Match Session.
- Running a Match Session – Having Paribus execute the Match Session that you configured in Step 1.
- Review – Having a person, or people, review the results of the matches Paribus found to ‘tell’ Paribus:
- If you agree that members of the groups it found are actually duplicates (or not) and
- Which of the group members in each group should be the Primary (surviving) record into which the data from the duplicate record(s) should be moved.
- Processing – Using the Paribus Plug-in built for your specific CRM system to execute the merging of all of the approved groups within the Match Session that you have reviewed.
During Step 2 (Running a Match Session) and Step 4 (Processing), the computers are doing all the work, therefore our focus will be on the parameters configured in the Setup (Step 1), as this is where we can define the optimal configuration to minimize the time users spend in Review (Step 3).
During setup, you are building a collection of re-usable building blocks. Although there’s some work involved in getting these building blocks in place, this is time well spent so that you can minimize the time spent actually using Paribus to find and merge duplicates.
Setup
There are a couple of key areas we can focus on to speed up the process of setting up Paribus for your use. When you’re using Paribus with Saleslogix/InforCRM, Microsoft Dynamics CRM or Sage CRM, the first thing you should do is import our pre-set Definitions we’ve developed for that particular CRM system. This is the simplest way to get started with these CRM systems, as we’ve completed much of the setup work for you. These Definitions are found in the …\Application Support folder of your Paribus kit. They’re the files with the .pds extensions.
The included Paribus Definitions provide Data Sets for all of the data elements most commonly used for comparisons. They also include:
- Pre-configured Conditions for secondary matching criteria
- Match Set templates for quick creation of Match Sessions
- Examples of commonly used Match Session configurations for identifying matching Accounts, Contacts and Leads within the standard CRM data configurations for these systems.
So, to minimize the time needed to get Paribus configured for you data, using the pre-set Definitions is clearly the best option as a starting point.
For a better understanding of what we would do in the Setup to maximize efficiencies, let’s start with a quick overview of the Review step.
When reviewing results of a Match Session, users are answering two questions:
- Are the members of this group of matches actually duplicates we would like to process?
- If we agree that the records should be merged, which record should be the surviving record?
(The last section of this article contains special notes related to the options for merging in Microsoft Dynamics CRM)
OK, those decisions sound pretty straightforward. So, how can we construct Match Sessions to give us the best results and spend the least amount of time in the Review process? First, let’s talk about the size of your batch – yes, size does matter.
When running the Match Session, Paribus is running query after query looking for duplicates. It’s doing some heavy processing. If you’re only looking at a few thousand records, the Match Session could take less than a minute or two to run. If you’re looking at a few HUNDRED thousand records, it might take a few hours to run. OK – the computer’s doing the work, so you can just walk away and do something else. But… once it’s done, you’ll have the potential of a HUGE list of Match Groups to review. There are some things to consider here:
- If it will take days/weeks to review the results, your reviewer(s) would likely feel like there’s no light at the end of the tunnel.
- There will have been lots of changes in the data between running the Match Session and performing the Cleansing Session. While Paribus can handle this just fine, there may be the chance that your decisions might have changed with changes in the data by that point.
- The Merge will take a long time to process and we suggest that this step is run when there’s minimal activity in the system to avoid any performance degradation or conflicts.
- It will be a long time before your users will see any benefit from the work you’re doing.
As you can see, there’s good reason to break things up into manageable-sized groups of records. There’s no single way you’ll find all the matches, so some thought into how you can logically break things into smaller groups can actually help speed up the project and show your users some immediate and growing improvement in quality.
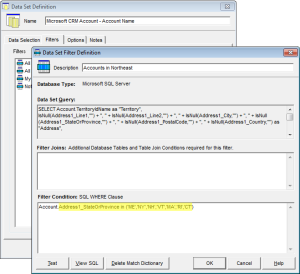
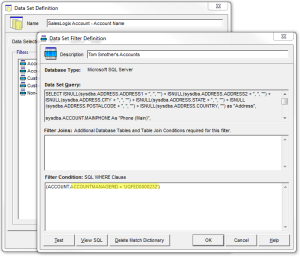
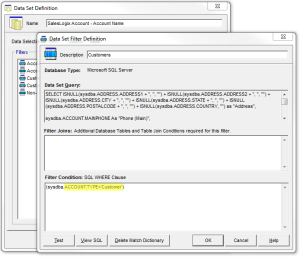
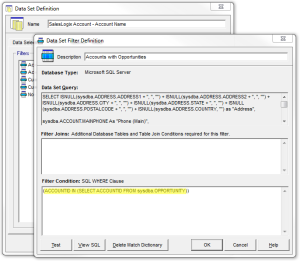
How should we break our data into smaller groups of records? That depends on your data and how you use it, but here’s some ideas (click on the title for an example) to elicit ideas that could work for you. Note that some examples are from use with Infor CRM and others are for use with Microsoft Dynamics CRM, but in all cases, the same concepts apply:
- Geographically – Filter by Country, State/Province, ZIP/Postal Code ranges, etc.
- Management – Filter by Account Manager or record Owner, etc.
- Type – Filter by Account Type, Contact Type, Status, SIC Code, etc.
- Status – Filter by Active or Inactive. Or in more specifically, you could filter by whether an Account has Opportunities (or not) or Tickets/Cases (or not), etc.
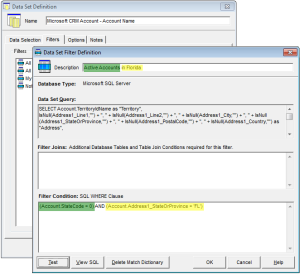
- A mix of different criteria – Filter by a combination of items like Active in Florida or Customers who have Open Opportunities, etc.
You get the idea.
Note – It’s generally OK to break Contacts up by the first letter of their Last Name (usually users at least get that single character right, even if they don’t spell the name correctly), but DON’T break Accounts up by the first letter of their name; you’ll eliminate the ability to find matches between names like Container Store and The Container Store.
So, how do you tell Paribus which records you want to look at? Filters.
Paribus Discovery Filters
A Match Session is based on a Data Set. This defines a) what data source you’re looking at and b) which specific records within that data source you’re comparing. Filters are a part of the Data Set definition and allow you to look at a subset of your database instead of the entire set of records.
For instance, you’ve created a Paribus Data Provider to point to your CRM system and you’ve created a Match Session based on matching Account Names as your primary match criteria. Without a Filter, you would be telling Paribus to look at the entire set of Accounts in your CRM system for duplicates. In some cases, that’s fine, but often you would want to either exclude certain records (e.g., inactive or hidden records) or you may want to create a group for a Match Session that is entirely made up of Customers and another group that are Non-Customers.
With these two Filters, you can compare your Customers to your Non-Customers with the goal of merging any data contained in your Non-Customer records into your Customer records and de-activating or ultimately deleting the duplicates.
One major benefit of this type of comparison is that you can then intentionally identify your Customers as being the Primary record (survivor) in each Group (records from Data Set A). This automatically answers Question 2 above, and eliminates the need for attention to this point in the Review, saving precious time.
If your Match Session is based on matching criteria that is very strict (e.g., 99-100% on 2 or 3 items), then you should have a very high level of confidence in answering Question 1 above regarding which Groups are duplicates. For example, if you ran a Match Session looking for a 99% match on Company Name and a 99% match on Full Address, AND you agree that this is a good criteria for finding duplicates, then you should be fairly confident that your Session Results will only contain groups of actual duplicate Accounts.
By combining a Filter comparison like Customer vs Non-Customer and the high level of similarity outlined above, in many cases you can eliminate the review entirely by clicking the Global Group Review button on the Session Review toolbar ( ![]() ) and choosing to mark every Group in the Session as Reviewed.
) and choosing to mark every Group in the Session as Reviewed.
The Process
So, let’s put this together into a plan for cleaning up Accounts.
- Set up some filters that logically group your Account records into defined groups that help you easily say that records from Group A will ALWAYS win over records from Group B. The above scenario of Customers vs Non-Customers is a good example. Other examples would be Accounts with Opportunities would win over Accounts without Opportunities or Accounts with an AccountID from your ERP system would always win over Accounts that don’t have an AccountID.
(Note – As outlined in the example above, you can create Filters based on multiple criteria. This is very relevant when you have a very large data set where you might want to separate the data even further. You could compare on something like Bob’s Customers vs Bob’s Non-Customers; i.e., filtering by both type and management.
- Create a Match Session that compare at a very high match threshold (e.g., 99%) on Account Name and something like Full Address and apply the Customer Filter to A and the Non-Customer Filter to B and tell Paribus to automatically nominate the member from A as Primary. There are sample Match Sessions just like this in the Paribus Definitions you imported!
- Run the Match Session. This will identify matching records that are so similar and oriented in the right direction already so that you can simply spot-check in the Review and mark all of them as “Reviewed”. Then run the Cleansing Session for these approved results. This will merge all the duplicate data into the Account that was nominated as the Primary record and delete (or hide) the duplicate Account records. Your data is already starting to look better!
You can now go back and run a similar session for a different Account Manager or geography or take the same configuration and simply lower the Match Score Threshold to allow for more ‘fuzziness’ in the comparison to catch more matches.
Note – the lower you set the Match Score Threshold, the more care you’ll need to take when reviewing, but take care – you’ll also be introducing the possibility of Paribus finding matches that you disagree with and would not wish to merge.
You’re now on your way to cleaner data. The hope is that this will give you some ideas on how to logically set up your Filters to get some quick results that your users will appreciate.
Options for merging in Dynamics CRM
There is a unique option within the Paribus for Dynamics CRM plug-in that allows for the selection of the Primary record (surviving member in a Match Group) at the time of the merge. You can have Paribus automatically choose the Primary record in each Group by these criteria:
For Account Merges:
- Account most recently Created
- Account most recently Modified
- Oldest established Account
- Account with most Contacts
- Account with most recent History
For Contact Merges:
- Contact most recently Created
- Contact most recently Modified
- Oldest established Contact
- Contact with most recent History
For Lead Merges:
- Lead most recently Created
- Lead most recently Modified
- Oldest established Lead
- Lead with most recent History
If your decision of which member of a Match Group can be determined by these comparative criteria, you might be able to entirely eliminate the need to take the time to choose a Primary record during the review. If you have a special need for some other comparative criteria, the Paribus Discovery SDK would allow you to develop your own Match Group evaluation specific to your needs (this would require .Net programming).
If you have any questions about running match sessions in Paribus Discovery, please get in touch.
| Related Resources: | |
| Further Information: |


